
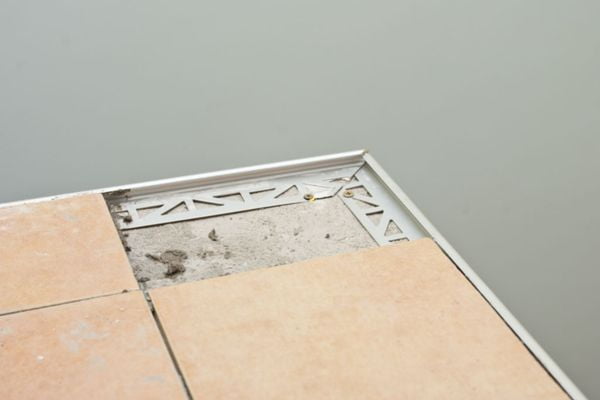
Tired of seeing chipped tile edges ruin your hard work? Those raw edges collect grime and can easily crack. Aluminum trim is the professional solution you need.
To install aluminum trim, you cut it to size. Then you press its anchoring leg into fresh thin-set mortar. After that, you set your tiles firmly against the trim’s edge for a clean, protected finish.
I almost ruined my first bathroom backsplash by forgetting this step. The tiles looked great, but the edges were a disaster. Let me show you the simple method I learned so you can avoid my mistake.
Why Use Aluminum Tile Edge Trim?
I use aluminum tile trim on almost every tile job. It is not just for looks. It serves very important functions. It takes a project from looking “good enough” to looking truly professional. This small detail makes a huge difference in the final quality and durability of the work.

Protection
Tile edges can chip easily. This happens a lot in busy areas like kitchen counters or shower niches. The metal trim acts like a shield. It protects the fragile tile from bumps and cracks. This simple step can save you from costly repairs later on. It keeps the tile looking new for years.
Aesthetics
The trim creates a clean line. It makes a smooth transition from tile to another surface, like drywall. You do not see the rough edge of the tile. Instead, you see a crisp, finished border. It gives the whole installation a very modern and polished look.
Versatility
There are many styles of aluminum trim. You can find a profile that matches any design.
| Trim Profile | Best Use Case | Design Style |
|---|---|---|
| Round Edge | Wall corners, countertops | Soft, contemporary |
| Square Edge | Floors, backsplashes | Modern, minimalist |
| L-Shape | Edge of floors, against carpet | Traditional, functional |
| Cove Shape | Inside corners, countertops | Hygienic, easy to clean |
You can also find them in many finishes. You can choose brushed nickel, chrome, matte black, or even brass. You can match your faucets or other fixtures perfectly.
Hygiene & Maintenance
Grout lines on an open edge can get dirty. They are hard to clean. The trim creates a solid, sealed edge. Dirt and grime cannot build up in the corner. A quick wipe is all it takes to keep it clean. This is especially important in kitchens and bathrooms.
Pre-Installation Essentials: Gathering Your Tools and Materials
Having everything ready before you start is key. I learned this the hard way. I once had to run to the store covered in mortar because I forgot my file. A little preparation makes the whole process smooth. You should lay out all your tools and materials so they are within easy reach.

Choosing the Right Trim Size
This is the most important choice you will make. If the trim is too small, the tile will stick out. If it is too big, you will have a large, ugly grout line. The rule is simple. The trim’s height should be slightly thicker than your tile.
For example, if your tile is 8mm thick, you need a trim that is about 9mm or 10mm high. This extra space accounts for the thin-set mortar you place under the tile. Always check the tile box for its thickness. Then buy your trim to match.
Essential Tools and Materials
Here is a simple list of what I keep in my tool bag for this kind of job.
| Category | Item | My Personal Tip |
|---|---|---|
| Tools | Measuring Tape | Double-check every measurement. |
| Miter Saw or Hacksaw | A miter saw with a carbide blade gives the cleanest cut. | |
| Metal File | Use this to smooth every cut edge. It prevents snags. | |
| Notched Trowel | The notch size should match what your tile needs. | |
| Margin Trowel | Great for scooping mortar and applying it in tight spots. | |
| Rubber Mallet | Use it to gently tap tiles into place without breaking them. | |
| Materials | Aluminum Trim | Buy an extra piece, just in case of a bad cut. |
| Thin-Set Mortar | Use the same mortar for the trim as for the tiles. | |
| Painter’s Tape | Helpful for holding long pieces of trim in place while you work. | |
| Tile Spacers | Essential for even grout lines between the trim and tile. |
The Step-by-Step Installation Process
Now we get to the fun part. I will walk you through each step. Take your time. A patient approach always gives the best results. The goal is to make the trim look like a natural part of the tile installation.

1. Measure and Cut the Trim
First, measure the length you need. If you are doing a simple edge, this is a straight measurement. For corners, it gets a bit more complex. I will cover that later.
When you have your measurement, it is time to cut. A miter saw with a blade made for cutting non-ferrous metals is best. It makes a perfect, clean cut every time. If you do not have one, a simple hacksaw with a fine-tooth blade also works. Just be sure to clamp the trim down so it does not move while you cut. After you cut, always use a metal file to smooth the sharp edge. This step is important for safety and a good fit.
2. Prepare and Mix the Mortar
Your surface should be clean and ready for tile. Now you can mix your thin-set mortar. Follow the directions on the bag. I mix mine in a small bucket. I add water slowly until it has the consistency of creamy peanut butter. It should be able to hold its shape on the trowel.
3. Setting the Trim
This is the critical step. You apply a layer of thin-set mortar to the wall or floor where the trim will go. Use your notched trowel. Then, you take your piece of aluminum trim. You press its perforated anchoring leg firmly into the wet mortar. The holes in the leg help it grab the mortar.
After it is pressed in, take your margin trowel. Use it to spread more mortar over the top of the anchoring leg. Make sure it is completely covered. The goal is to embed the entire leg in mortar.
4. Setting the Tiles
Now you can set your tiles. Push the first tile firmly into the mortar. Make sure its edge butts up directly against the trim. Use tile spacers to create a small, consistent gap between the tile and the trim. This gap will be filled with grout later.
Place your next tiles next to the first one. Use a level to check your work. The trim and the tiles should all be perfectly flat and level. You can use a rubber mallet to gently tap them into place.
5. Cleaning Up
Mortar dries hard like concrete. It is very difficult to remove once it dries. So, you must clean as you go. Use a damp sponge to wipe any excess mortar off the face of the tiles. You should also wipe the face of the aluminum trim. Make sure your grout lines are also clean and free of excess mortar.
Conquering Corners: Inside and Outside
Corners are where a good tile job really shines. A clean corner joint shows true craftsmanship. My first attempt at a mitered corner on a kitchen island was a bit rough. But I learned that with a little practice, it is very achievable.

Outside Corners
An outside corner is the most common corner you will encounter. You need to make a miter cut. This means cutting two pieces of trim at a 45-degree angle. When these two pieces meet, they form a perfect 90-degree corner. Use your miter saw for this. Set the angle to 45 degrees and make your cuts. Always do a “dry fit” first. This means putting the two pieces together without mortar to make sure they fit perfectly.
Inside Corners
Inside corners are more forgiving. You have two options. You can miter them just like an outside corner for a very custom look. Or, you can do a butt joint. For a butt joint, you run one piece of trim all the way to the corner. Then you cut the second piece and butt it up squarely against the first one. This is simpler and often looks just as clean.
Grouting and Final Touches
Wait for the mortar to fully cure. This usually takes 24 hours. Then you are ready for grout. You apply the grout over the tiles and make sure to push it into all the gaps. This includes the small gap between the tile and the aluminum trim.
After you apply the grout, you clean the surface with a sponge. This reveals your clean grout lines. The final result is a beautiful, durable, and professionally finished tile edge.

Conclusion
So, the key to a great finish is simple: measure carefully, cut cleanly, and set the trim securely in your mortar. But the quality of the trim itself makes all the difference. As manufacturers, we at NIUYUAN craft our aluminum tile trims for easy cutting and a perfect fit, ensuring you get a professional result without the hassle. Choose NIUYUAN for your next project and give your tile work the quality edge it deserves.