
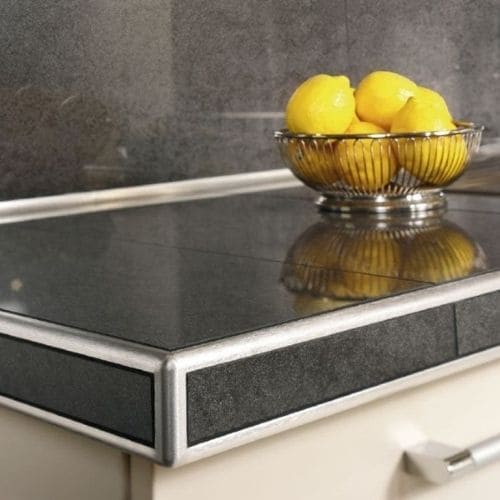
A tiled worktop edge is touched, knocked, and wiped every day. It is the one tile edge in a kitchen that hands, plates, and cleaning cloths meet head-on. A cut tile edge left bare here chips fast and stays visible.
This guide covers tiled worktop edges only: the front edge, the side returns, the corners, and the sink cut-out. It shows which profile suits each edge, how to size it, and what to check before you order. The wall above the worktop is a different job, covered by the backsplash trim page, not by this guide.
Worktop Edges at a Glance
| Worktop edge | Edge type | Profile to start from | Watch point |
|---|---|---|---|
| Front edge, full run | Straight, high-contact edge | Square-edge, round-edge, or L-shaped | One profile and one finish for the whole run |
| Side return, where the top ends | Short exposed edge | Same profile as the front edge | A different profile at the side breaks the line |
| Front-to-side corner | Exposed outside corner | Same profile, plus corner pieces | Count corners with the straight lengths, not after them |
| Sink cut-out rim | Wet, hard-used rim | Same profile, stainless steel first | Rim corners need corner pieces, not cut-and-hope joints |
| End against a wall or tall unit | Hidden or semi-hidden end | Same profile, finished with an end cap or neat return | Plan the end before tiling, not at the last length |
Use this table as a counting tool. Walk the worktop, note each edge, and you have your profile list. The sections below explain each row in turn.
Size It From the Thickest Tile
Trim height follows tile thickness plus the adhesive bed. Measure the tile at its thickest point, not at a tapered or bevelled edge. A worktop tile that measures 10 mm at its thickest point needs a profile taller than 10 mm. That extra height lets the tile sit flush with the trim face after setting.
Do not size from the thinnest tile in the batch. Mixed thickness along one front edge shows up as a wavy line at eye level. If one box runs thicker than the rest, size for that box. Check the result on a short trial run before the full worktop goes down. Full sizing detail is in the size guide.
Front Edge: The Edge You Touch Every Day
The front edge takes the most contact in the kitchen. Plates slide over it, hands grip it, and cloths wipe across it. That daily contact makes the front edge the wrong place for a fragile finish or a sharp, unfinished cut.
Round-edge profiles soften the front edge and hide small chips. Square-edge profiles give a sharp, modern line but show every uneven cut. L-shaped profiles give a clean straight edge with a wide choice of materials and finishes. The choice is the same matched-versus-contrast decision as on a wall. A finish matched to the tile makes the edge disappear. A contrasting finish turns it into a border.
Pick one approach for the whole run and stay with it. Mixing a matched front edge with a contrasting side return looks accidental. See the round-edge range, the square-edge range, and the L-shaped range for the three faces described here. The profiles guide compares the six core shapes if you are choosing between them.
Side Returns and Corners: Keep One Line Around the Bend
A side return is short, but it is fully visible from the side of the kitchen. Use the same profile and the same finish as the front edge. A different profile at the side breaks the line at exactly the point where the eye follows it around the corner.
Where the front edge meets a side return, the corner needs a factory corner piece where the profile range offers one. A mitred tile corner can look sharp, but it depends on the cutter, not on the profile. Count each front-to-side corner with the straight lengths, and count the sink rim corners in the same order. Straight lengths alone leave you short at every corner.
End the run cleanly where the worktop meets a wall or a tall unit. Plan that junction before tiling. An end cap or a neat return beats a cut length left raw against the unit. The accessories page covers corner pieces, connectors, and end caps as a set.
Sink Cut-Out: The Wettest Edge on the Worktop
The sink rim is the wettest edge on a tiled worktop. Water sits on it, splashes over it, and drains across it. Use the same profile as the front edge, so the rim reads as part of the same worktop, not as a separate repair.
Confirm the rim detail with your installer before tiling starts: which joints take grout, and which take a flexible sealant. That decision belongs to the worktop system, not to the trim alone, and it is much harder to change after the tiles are set. No profile by itself seals a sink rim.
For material, start from stainless steel here. The site’s kitchen page names stainless steel 304 and solid brass as the profiles commonly specified for countertop and worktop edges. It names 304 as the standard kitchen material. Check the stainless steel range for the grade and finish lines that cover a sink rim.
Where the Worktop Meets the Wall: A Joint, Not a Trim
The line where the worktop meets the wall is a joint, not a worktop edge. It takes a flexible sealant, not a second profile laid flat along the back. A trim profile forced into that joint traps water and looks like a repair.
Tile edges on the wall above that joint are wall edges, and they follow wall rules. The wall edge guide covers those cases: half-height tops, outside corners, inside corners, and niches. Keep the two jobs separate when you order, so the worktop lengths and the wall lengths are counted on different lists.
Materials for a Worktop: Start From the Kitchen Lineup
Worktop edges do not need the same material as a dry wall. The site’s kitchen page names square-edge and bullnose profiles as the preferred shapes for countertop use. It names stainless steel 304 and solid brass as the materials commonly specified there. That lineup is the right starting point for a front edge that takes daily knocks and constant wiping.
Aluminium suits dry, low-impact edges, and it is the standard material named for backsplash edges on the same kitchen page. It is not the first choice for a hard-used worktop front edge. PVC is not named for worktop edges on the kitchen page at all, so do not order it as a worktop front-edge default. If a supplier offers either material for a worktop front edge, ask what worktop use it is specified for before you accept it.
Check the finish sample under the kitchen’s own lighting before ordering. A finish that looks right in a warehouse can shift under warm kitchen light. It must sit beside taps, handles, and appliances, not beside a catalogue photo. For the full kitchen picture, the kitchen trim page covers backsplash edges, countertop perimeters, wall corners, and window returns as one room.
Other Ways to Finish a Worktop Edge
Metal profiles are not the only way to finish a worktop edge. Matching bullnose tile pieces, V-cap tiles, and mitred tile corners all appear in kitchen work. Each has its own trade-offs in cost, skill, and repairability. This guide covers metal profiles only.
If you want to compare the no-trim finishes properly, the guide to finishing edges without trim compares five methods side by side. Decide the finish before the first tile is set. A metal profile set into the adhesive during tiling cannot be swapped for a bullnose piece afterwards without rework.
Before You Order: Six Checks
- Measure the thickest tile in each batch, and size the worktop edge from that figure.
- Count the front edge, both side returns, and the sink rim as separate lengths.
- Count front-to-side corners and sink rim corners, plus end caps for each run end.
- Confirm the sink rim joint treatment, grout or flexible sealant, with your installer before tiling starts.
- Check the finish sample under the kitchen’s own lighting, beside the taps and handles it will sit with.
- Keep the worktop lengths and the wall lengths on separate lists, so neither job borrows from the other.
Frequently Asked Questions
Should the front edge and the side returns use the same profile?
Yes, in most cases. The same profile and finish around the front and the sides reads as one worktop edge. A different side profile breaks the line where the eye follows it around the corner.
Does a worktop edge need a different height than a wall edge?
It can do. Height follows the tile on that surface, plus its adhesive bed. Size the worktop from the worktop tile and the wall from the wall tile. Do not carry one height across both jobs.
Round-edge or square-edge for a family kitchen?
Round-edge is the safer default where the edge takes daily knocks. Square-edge works where the cuts are straight, the tile thickness is consistent, and the sharp line is a deliberate design choice.
Does a sink cut-out need a special profile?
No special shape is needed. The rim needs the same profile as the front edge, in a material suited to constant wetting. Its corners count as corner pieces. The sealant decision at the rim matters as much as the profile.
Can trim be added to a worktop edge after tiling?
Retrofit profiles exist, but they are not the same as a profile set into the adhesive during tiling. A set-in profile must be decided before the first tile goes down, so confirm the finish at order stage, not after the worktop is laid.