
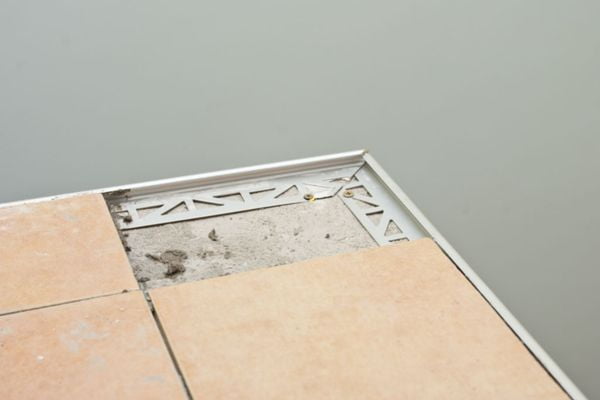
Trim should finish flush with the tile face, or just below it. A trim that stands proud catches feet, mops, and trolley wheels, while a trim set too low leaves the tile edge exposed to chips. Most mismatches come from one wrong number at order time: the trim depth did not match the real tile thickness plus the adhesive bed. Check the height before the adhesive cures, because that is when a fix is still cheap.
The fix depends on which way the trim is wrong and whether the adhesive has set. A proud trim can be pressed deeper while the bed is open, or ground down after it cures. A recessed trim needs packing under the tile or a deeper profile. This guide splits the two cases, lists the causes, and gives a check to run before tiling starts.
Proud or recessed: two different problems
A proud trim stands above the tile face. It catches cleaning cloths and bare feet, and it takes knocks from trolleys and vacuum heads. On floors it is also a trip edge, and the risk is damage to the trim and to anyone who walks past it. Treat a proud trim as the priority when you walk a finished run.
A recessed trim sits below the tile face. It leaves a small ledge where the tile edge stands unguarded, so chips start at the corner and spread. Dirt and water also sit in the step, which shows as a dark line along the run. A recess of up to about 1 mm still reads as flush, so a small step is not always a failure. A deeper step needs a fix, because the edge has lost its guard.
Why the height goes wrong
Most mismatches trace to the order, not the tiler. The printed size on a trim length is the channel depth. It is the stack of tile plus adhesive the trim accepts, not the height of the visible face. A buyer who reads it as the face height orders a depth that is short by the adhesive bed. The bed adds 1 to 2 mm on walls and up to 3 mm on floors.
Five other causes show up on site.
- Tile thickness varies within one batch, so the box label is only a starting point.
- The adhesive bed is uneven where the trowel work is rushed.
- The substrate dips under the run.
- A membrane or levelling layer was left out of the depth count.
- The trim flange was never pressed fully home.
Check the height before you tile
A five-minute dry fit catches the error before it costs a run. Measure the real tile with a caliper, not the box label, and include the textured back in the reading. Add the compressed adhesive bed and any membrane or levelling layer. Then lay one tile and one trim length in adhesive, and check the joint with a straight edge.
Check along the whole run, not at one spot. Tile thickness drifts across a batch, and the substrate dips in places the eye misses. Where two standard trim depths bracket your number, take the deeper one and pack the extra channel with adhesive. A trim one step too deep can be packed out, while a trim one step too shallow has no fix except replacement.
Our tile trim dimensions and compatibility chart maps common tile thicknesses to trim depths. Our sizing rule for tile edge trim walks through the full method.
What you can still fix, and when it is too late
While the adhesive is open, the fix is simple. Press a proud trim deeper into the bed, or lift a low section and add adhesive under the tile. Tape the trim in place while it sets, and re-check with the straight edge before you move on. This is the only stage where a height error costs minutes instead of hours.
Once the adhesive has cured, the options narrow. A proud metal trim can be filed or ground down. The finish will show the work, so this suits a hidden run better than a feature edge. A small recess can be packed with grout or sealant, which hides the step but does not guard the tile edge. A wrong profile depth cannot be shimmed right: lift the run and fit the correct depth.
Where lifting the run is out of proportion, a surface-mounted retrofit profile can cover the edge without taking tile up. It sits on the tile face, so it reads as a frame rather than a flush edge. Weigh that look against a redo before you choose. For the common site errors that follow a bad height call, see our rundown of installation mistakes.
What to confirm when you order
Order the height in writing, not as a guess on site. Confirm the real tile thickness with the tile supplier before you order trim in bulk. Ask for a sample length to dry-fit against your tile and adhesive bed. State the full build-up in the order: tile thickness, membrane, and bed depth. For large orders, one wrong depth multiplies across every box.
If the tile thickness is the open question, our short answer on how thick tile trim should be sets out the sizing logic. New to trim profiles, start with what tile trim is for the shapes used here.
Frequently Asked Questions
Should tile trim sit flush with the tile?
Yes. Trim should finish flush with the tile face, or just below it. A trim that stands proud catches feet and cloths. A recess of up to about 1 mm still reads as flush.
How much deeper should trim be than the tile?
Pick a trim depth equal to the tile thickness plus the compressed adhesive bed. The bed adds about 1 to 2 mm on walls and up to 3 mm on floors. Where two sizes bracket your number, take the deeper one and pack the extra channel.
Can I fix trim that is too high after the adhesive cures?
You can file or grind a proud metal trim down, but the finish will show the work. Lifting the run and fitting the correct depth is the clean fix. While the adhesive is still open, press the trim deeper instead.
What should I confirm before ordering trim in bulk?
Confirm the real tile thickness with the tile supplier, and dry-fit a sample length against your tile and adhesive bed. State the full build-up in the order: tile thickness, membrane, and bed depth.


