
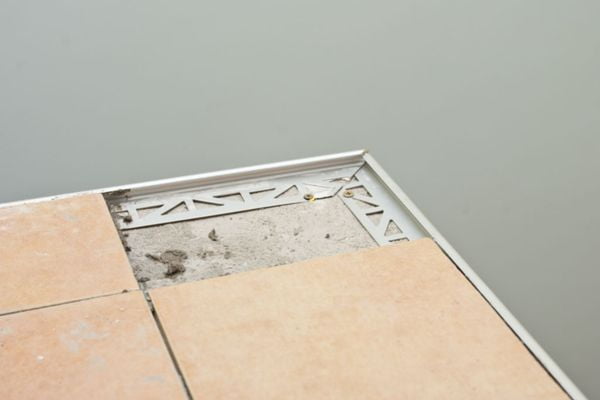
Tile Trim Installation Mistakes to Avoid
Most tile trim failures are set before the grout goes in. A shallow profile, a tight joint, or grout dried on a brushed finish will all show in the finished room. This guide lists the errors seen most often, with the cause and the fix before grouting. Use it as a pre-grout check, not a fitting guide.
Mistake 1: Choosing a Profile Height That Does Not Match the Tile
The most common trim error is a height mismatch. It comes from picking a profile by nominal size alone, without measuring the tile in hand. Nominal sizes can differ from true thickness, so a tile sold as 8 mm may measure above or below that figure. The fix is simple: measure several tiles with a caliper, then pick a profile that matches the thickest reading.
Our tile trim size guide states the working rule. Choose a profile depth equal to the tile thickness, or 1 to 2 mm deeper. That extra depth leaves room for the adhesive bed and keeps slight tile variation covered. A profile much deeper than the tile is a second error, because it stands proud and catches feet, mops, and cleaning cloths. An L-shaped profile is the common choice for a straight exposed edge.
Check the finished height before grouting. The trim face should sit flush with the tile face, and a rise of less than 1 mm above the tile is acceptable. A trim face below the tile face is not acceptable, since it leaves a raw edge exposed to chips. It also forms a dirt ledge that is hard to clean. If the height is wrong, swap the profile now.
Mistake 2: Closing the Joint Too Tight, or Letting It Wander
The second error is joint width. Some installers butt the tile hard against the trim, while others leave a wide gap that wanders along the run. Both choices look poor, and a tight joint is worse, because it leaves no room for grout to key in. The joint then cracks or opens as the room moves.
Keep the joint beside the trim consistent with the field joints, using the same spacers. Industry guidance sets a firm floor for joint width. ANSI A108.02 states that no grout joint should be less than 1/16 inch (1.6 mm). TCNA guidance adds a higher minimum: at least 1/8 inch for rectified tile, 3/16 inch for calibrated tile.
Uneven joints have a different cause, and they usually come from an unanchored trim run. The profile drifts while tiles are set against it, so the joint beside it drifts too. Anchor the trim in adhesive first, then check the line with a straightedge before the adhesive sets. A straight trim line makes every joint beside it read straight too.
Mistake 3: Grouting a Joint That Needs to Move
The third error is grouting a joint that should flex. Inside corners, wall-to-floor junctions, and changes of plane all move slightly as buildings settle. Heat and moisture cycles move materials slightly, and rigid grout cannot stretch with that movement. It cracks along the corner and lets water reach the substrate behind the tile.
Use a flexible sealant at every change of plane: inside corners, wall-to-floor joints, and junctions with a different material. Keep rigid grout for tile-to-tile joints on the same flat plane. The same logic applies to planned movement joints in large fields. TCNA EJ171 guidance places them at most 25 feet apart indoors and 8 to 12 feet apart outdoors.
Perimeter joints need width as well as flexibility, and TCNA EJ171 guidance sets them at walls at not less than 1/4 inch. A trim profile can cover a perimeter joint, but it cannot replace the joint itself. Do not fill a movement joint with grout and hope the trim hides it.
Mistake 4: Cutting Corners Badly and Fixing Trim Too Late
The fourth error pair sits at corners and ends. A mitre cut at the wrong angle leaves an open, sharp V at the corner. A burred cut edge is just as bad, because it leaves a rough lip that snags cloths and skin. Both flaws survive grouting, since grout fills a gap but cannot square a bad angle. Cut on a trial piece first, and deburr every cut edge before fixing.
Corner pieces exist for a reason: where a mitre is hard to cut cleanly, a factory corner piece gives a closed, even corner. Our comparison of mitring versus corner pieces sets out when each option suits the job. For straight cuts the same discipline applies: measure twice, support the profile, and check the cut end before fixing.
Fixing order is the second half of this error. Its flange then has no adhesive bed to grip, and the run stays weak at the edge. Set the trim with the tiles while the adhesive is still workable, checking height, line, and joint width. Once adhesive cures, every correction becomes a removal job, so our cutting guide and aluminium trim installation guide cover the detail.
Mistake 5: Letting Grout and Adhesive Mark the Finish
The fifth error is finish damage during grouting. Adhesive squeezed from under the flange dries on the trim face, and grout haze dries as a milky film across brushed or polished metal. Both marks look like permanent stains, yet both are easier to prevent than to remove. Wipe the trim face as work proceeds, not at the end of the day.
Fresh grout haze responds to plain water and a soft cloth. Sources on haze removal note that it can be cleared within a day or two of grouting. Older haze needs a cleaner matched to the grout type, since cement haze and epoxy haze need different removers. Test any cleaner on an offcut first, never on the finished run.
Two cleaning habits cause lasting damage, and both are easy to avoid. Abrasive pads and metal scrapers scratch polished and brushed finishes, while strong acidic cleaners can etch nearby natural stone and dull some metal finishes. Use a soft cloth, a mild cleaner, and clean water for rinsing, and tape the trim face during grouting if the finish is delicate. Remove the tape before the grout fully cures.
A Pre-Grout Check That Catches All Five Errors
Run this check before mixing grout, while every fault is still cheap to fix. Sight along each trim run for line and height, and press a straightedge across the trim and the tile face. Confirm that joints match the field width and that corners are left for sealant, not grout. Confirm that every cut end is smooth and closed, since five minutes here saves a removal job later.
Work through the checks in order, because the sequence matters. Line and height come first: a run that sits low or wanders has to be lifted and re-bedded, and that is only practical while the adhesive is still workable. Joint width and corner gaps come next, since both are spacer and sealant decisions that cost nothing to change at this stage. Cut ends come last: a rough end can be dressed in place with a file in a minute, but only before grout locks it in.
If a run is already grouted and still wrong, do not force a fix, since a hasty correction often damages more than it saves. A low or damaged run may need partial removal. Our guide to replacing damaged trim explains how to judge whether a run can be saved. Removal risks chipping a neighboring tile, so weigh that risk before lifting any fixed profile.
Frequently Asked Questions
Can tile trim sit slightly above the tile surface?
Yes, by a small amount: a rise of less than 1 mm above the tile face is acceptable. The trim face should never sit below the tile face, since a low trim leaves the edge exposed and hard to clean.
What joint width should I leave beside the trim?
Match the field joints in the same room, using the same spacers throughout the installation. No grout joint should be less than 1/16 inch (1.6 mm) under ANSI A108.02, and rectified tile needs at least 1/8 inch under TCNA guidance.
Should inside corners be grouted or sealed?
Seal them with a flexible sealant, because inside corners are changes of plane that move slightly over time. Rigid grout cracks in moving joints, so keep grout only for tile-to-tile joints on the same flat plane.
Can grout haze be removed from metal trim?
Fresh haze can usually be removed with water and a soft cloth if you act within a day or two of grouting. Older or epoxy haze needs a cleaner matched to the grout type, so test it on an offcut first.
Must a grouted trim run that sits too low be removed?
Not always, but a low run cannot be raised without lifting it, so judge the run before deciding. Check how many tiles it touches, how visible the fault is, and the risk to neighboring tiles. Our guide to replacing damaged trim sets out that judgment.


