
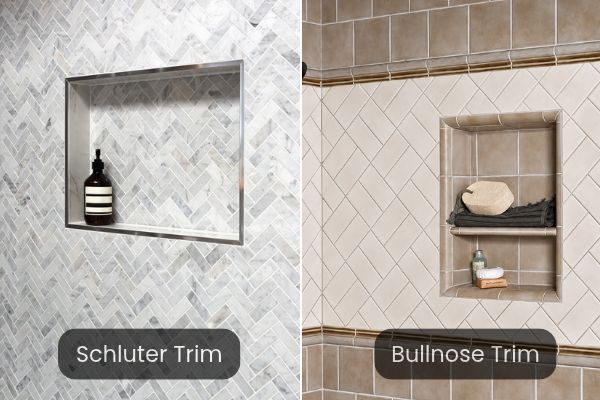
An outside corner and an inside corner ask for opposite things from a tile trim. The outside corner is exposed, so it needs a profile that guards the cut edge against knocks. The inside corner is a joint between two planes, so it needs movement and a seal. Mix them up and the trim fails in the first year: a rigid profile across a moving joint cracks, and an unguarded outside edge chips.
The choice is not which corner looks better, but which corner takes impact and which corner moves. The close is a profile, a cove profile, or silicone alone. This guide gives a zone matrix for that call and a three-way comparison for inside corners. The RFQ list at the end is ready to send as it stands.
Outside vs inside at a glance
The outside corner is the convex edge where tile turns outward: a niche rim, a half wall, a column, or a window reveal. Its job is to cover the unglazed cut edge and take the knock that would otherwise chip the tile.
The inside corner is the concave joint where two tiled planes meet: wall to wall, wall to floor, or the back of a shower. Its job is to hide the joint and let the two planes move a little without cracking.
| Corner | Where | Job | Profile shapes | What fails first |
|---|---|---|---|---|
| Outside corner | Niche rim, half wall, column, window reveal | Guard the cut edge, take impact | L, round-edge, square or box | Chipped tile edge, dented profile |
| Inside corner | Wall to wall, wall to floor, shower back | Hide the joint, take movement | Cove, plain straight edge | Cracked rigid grout, failed seal |
The two profiles are not interchangeable: an outside profile set into an inside corner leaves a hard edge where a joint should flex. A cove profile on an outside corner has no edge to guard. If the detail calls for a sealant joint or a movement joint, keep that function in the spec. A profile cannot replace it.
The zone decision matrix
One rule rarely serves a whole job, so decide by zone. Dry living areas take the lightest touch, wet areas take the most sealing, and commercial work takes the hardest profile. The matrix below is a starting point, so check each row against the real tile, the cleaning routine, and the waterproofing spec.
| Zone | Outside corner | Inside corner |
|---|---|---|
| Dry living areas: column, window reveal | L profile in aluminum | Plain profile or silicone bead |
| Wet shower: walls, niche back | Round-edge in stainless 316 or chrome-plated brass | Cove profile, or silicone-only joint |
| Commercial high-traffic: hotel corridor, kitchen wall to floor | Stainless steel outside corner | Cove profile in stainless steel, sealed |
| Wall to floor: bathroom, kitchen | Not applicable | Cove profile or silicone bead |
The wall-to-floor joint deserves its own row because almost every guide skips it. It is an inside corner that also takes foot traffic and cleaning water. A plain silicone bead alone wears fast there. A cove profile gives the joint a cleanable arc and a fixed edge, while the membrane underneath does the waterproofing. Check the membrane spec before you choose, because the profile sits on top of it, not instead of it.
Three ways to close an inside corner
An inside corner can close three ways, and the right one depends on water load and cleaning. A cove profile gives a smooth concave arc that is easy to wipe and seals along two grout lines. A plain profile with a silicone bead gives a crisp line and a flexible joint. Silicone alone gives the cheapest close and the most flexible joint, but it needs rework sooner and shows dirt first.
| Close | Movement | Cleaning | Durability | Install timing | Cost tier |
|---|---|---|---|---|---|
| Cove profile | Least flex, fixed arc | Easiest, smooth arc | Longest | While tiling | Highest |
| Plain profile plus silicone | Flexes at the bead | Grout line shows | Long | While tiling | Middle |
| Silicone alone | Most flex | Stains first | Shortest, needs rework | After tiling | Lowest |
Waterproofing is not a column in this table. None of the three replaces the membrane, so all three need the membrane behind the tile done right.
For a shower, the cove profile is the usual pick: the arc sheds water and wipes clean, and the two grout lines seal the joint.
For a dry living-room corner, silicone alone is often enough, because there is no water load and the joint barely moves. For a commercial kitchen wall-to-floor joint, take the cove profile in stainless steel. The cleaning load alone will wear a silicone bead out. Our inside-corner cove profile versus silicone guide compares the two in full.
Sizing: measure the tile, then add the bed
Trim depth follows the real tile, not the box label. Measure the tile with a caliper, including the textured back, and add the compressed adhesive bed and any membrane.
Trade guides put the trim about 1.5 to 2.5 mm deeper than the tile. One depth table lists 8 mm tile with 10 mm trim. It lists 10 mm tile with 12 or 12.5 mm trim. Where two sizes bracket your number, take the deeper one and pack the extra channel.
Dry-fit one length before you commit: lay a tile and a trim length in adhesive. Check the joint with a straight edge, and check along the whole run, because tile thickness drifts across a batch.
Ask the supplier for the profile section drawing. Check the face width, the anchor leg, and the channel depth against your tile. Our tile trim dimensions and compatibility chart maps common tile thicknesses to trim depths. Our page on how to size trim to your tile sets out the full method.
Corner joints: mitre or factory corner pieces
An outside corner still needs a joint where two trim lengths meet. The 45-degree mitre is the common site joint. It does not suit every profile, so check the product design before you cut. Factory corner pieces give a cleaner joint at the niche and the corridor turn. They save the tiler from improvising on site. A continuous vertical profile is the third option where the corner runs floor to ceiling without a break.
Three-way joints and end caps belong on the same order as the trim. A niche has four outside corners and two inside corners in one small box. Count the pieces per opening, not per room. Order the accessories as a set, with counts, because a run that arrives without its corners stops the job. Our outside-corner tile trim guide covers the profile shapes and the joint options for that corner in full.
Trim is not waterproofing
The most expensive mix-up in corner work is treating trim as the waterproof layer. Trim protects the tile edge and covers the cut, but the membrane behind the tile keeps water out of the wall. Inside corners, penetrations, and movement joints still need the tile system’s own spec, whatever profile you choose. A buyer who specs trim as waterproofing will order the wrong product and blame the trim for a leak the membrane should have stopped.
Put the check in writing, starting with the membrane type and coverage. Add a sealant joint at every change of plane, and a movement joint where the tile system calls for one. For the common site errors that follow a bad corner call, see our rundown of installation mistakes.
What to put in the RFQ
Send these items to the supplier in writing before you order. A written answer beats a verbal promise when a delivery lands wrong.
- Corner type per zone: outside, inside, or wall to floor, with the profile shape.
- Real tile thickness, adhesive bed, and membrane build-up, with trim depth stated.
- Profile section drawing: face width, anchor leg, and channel depth.
- Material and finish: aluminum 6063/6463, stainless 304/316, brass H59, or PVC.
- Colour and length, with quantities per zone.
- Corner pieces, three-way joints, and end caps, listed with counts.
- Sample length to dry-fit against your tile and bed.
- Packaging and labelling, plus the site and the lead time.
One sample length is worth more than a page of promises. Dry-fit it against your tile and check the corner joint it makes. Sign the sample before the bulk order goes in. NIUYUAN keeps the sealed sample on file for two years. A later phase can be matched against the same reference. For the profile range behind this guide, start with the purpose of tile edge trim.
Frequently Asked Questions
Can I use an outside corner profile on an inside corner?
No. The two profiles are not interchangeable. An outside profile guards an exposed edge, while an inside corner needs movement and a seal. Use a cove profile or silicone for the inside corner.
Should an inside corner use a profile or silicone?
It depends on water load. A cove profile suits showers and commercial kitchens, where the arc sheds water and wipes clean. Silicone alone suits dry corners, where there is no water load and the joint barely moves.
How deep should corner trim be?
About 1.5 to 2.5 mm deeper than the real tile thickness, plus the adhesive bed and any membrane. Measure the tile with a caliper, not the box label. Where two sizes bracket your number, take the deeper one.
Does tile trim waterproof a shower corner?
No. Trim protects the tile edge and covers the cut. The membrane behind the tile keeps water out. Inside corners still need a sealant joint and a movement joint where the tile system calls for one.
What should I state in an RFQ for corner trim?
The corner type per zone, the real tile thickness with the adhesive bed, the profile section drawing, the material and finish, corner pieces with counts, and a sample length to dry-fit before the bulk order.


