
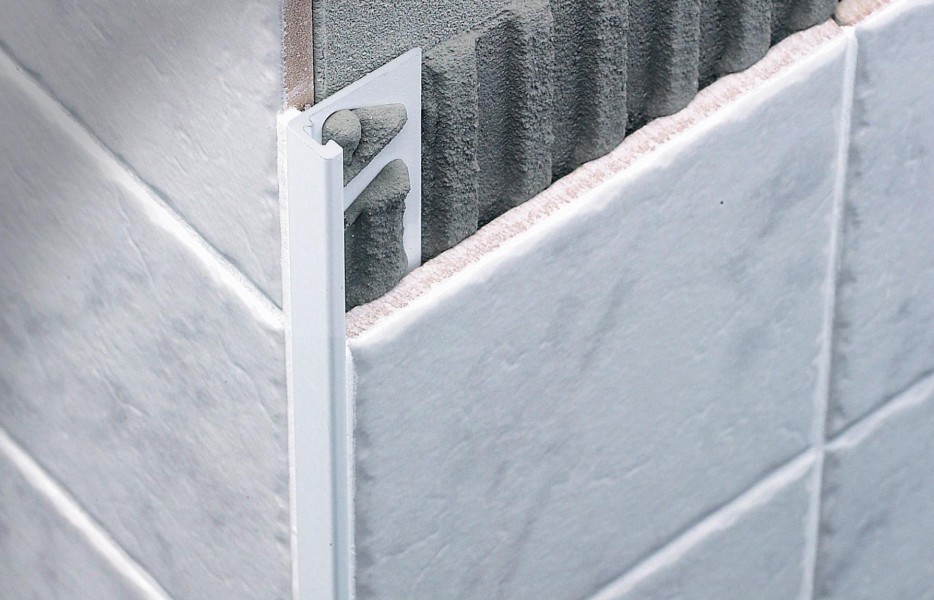
An outside corner is the exposed 90-degree edge where two tiled faces meet. It needs a finish that hides the raw tile edge and guards it against chips. For most buyers, an L-shaped metal trim is the safest default. It fits almost any tile, installs fast, and protects the edge, while the other options work too but each suits a narrower case.
This guide covers the five ways to finish an outside corner. It compares L-shaped and rounded trims, mitred tile edges, factory corner pieces, and bullnose edges. It also covers material choice and the checks buyers should run before ordering. Use it to match the finish to the room, the tile, and the traffic it will face.
Five Ways to Finish an Outside Corner at a Glance
No single method wins in every room. A shower niche, a kitchen island, and a hotel corridor face different loads. The table below sets the five options side by side, so read it first, then use the sections below for the detail.
| Method | Best for | Watch out for | Materials |
|---|---|---|---|
| L-shaped square-edge trim | Most wall corners and modern baths | Shows a visible metal line | Aluminum, stainless steel, brass, PVC |
| Rounded and quarter-round trim | Family baths and a soft look | Needs a matching corner piece | Aluminum, stainless steel, PVC |
| Mitred tile edges | High-end stone and slab walls | Fragile edge and skilled labor | The tile itself, no trim |
| Factory corner pieces | Long runs with many corners | Must match the trim range | Same as the trim |
| Bullnose or polished edge | Tile lines that offer it | Limited sizes and can chip | The tile itself |
L-Shaped Square-Edge Trim: The Default Choice
An L-shaped trim has one leg that sits under the tile and one face that shows as a clean line. The installer sets it in thinset before the last tile goes in, so the tile butts against the visible face and no raw edge shows. If the term is new, start with what tile trim does before you specify it.
It works with ceramic, porcelain, and stone, and it suits both thin and thick tile when sized right. For buyers, it is the easiest option to specify in volume, and one profile can serve many rooms, which keeps stock simple.
The trade-off is the look, because the trim reads as a thin metal or PVC line, not as tile. Some buyers accept this, while others want the corner to look like solid tile and should look at mitring instead.
Rounded and Quarter-Round Profiles
A rounded profile softens the corner instead of cutting a sharp line. It suits family bathrooms, schools, and any room where people brush past the edge. The curve also hides small bumps better than a square edge, but the catch is the joint where two runs meet.
A rounded profile needs a matching corner piece or a careful mitre cut on the trim itself. Order the corner pieces with the trim, and confirm they come from the same range. A piece from another range will not sit flush, and the gap will show.
Mitred Tile Edges: The Tile-Only Look
Mitring cuts the back of each tile at 45 degrees, so the two cut faces meet at the corner and only glazed tile shows. The result looks like solid stone folded around the edge. It is the cleanest look in this guide, and the most demanding to build. The installer needs a wet saw with a tilting head and steady hands, since small errors show at once.
A mitred edge is also the most fragile option here, because the cut leaves a thin point of tile with little body behind it. A knock can chip it, and a chipped mitre is hard to repair, so mitring suits low-traffic feature walls and showpiece niches. Busy corridors and family baths are safer with a metal trim. Our comparison of mitred corners versus ready-made corner pieces sets out the trade-off in full.
Factory Corner Pieces
Some trim ranges include ready-made corner pieces. The piece caps the joint where two trim runs meet at 90 degrees. It removes the need to mitre the trim itself, which saves time on site, and no cutting skill is needed at the joint.
This matters most on long runs with many corners, such as a hotel floor or a retail fit-out. The limit is range, because a corner piece only fits the profile it was made for, so buyers must order trim and pieces together. Check the piece count against the corner count on the drawings before you place the order.
Bullnose and Polished Tile Edges
A bullnose tile has a factory-rounded edge that wraps the corner. It matches the field tile exactly, so the corner looks like part of the tile. It is a good choice when the tile line offers it, though many lines do not offer the size the job needs.
A polished edge is the other trim-free option: the installer cuts the tile square, then grinds and polishes the raw edge. It works only on through-body porcelain and natural stone. Glazed ceramic will show its body color once the glaze is ground away, so do not specify it there.
Which Material to Specify
Aluminum is the common choice for dry rooms and standard baths, because it is light, easy to cut, and comes in many finishes. Stainless steel suits wet rooms, pools, and outdoor corners, where it holds up better than aluminum. Brass fits premium baths and lobbies, where the finish is part of the design. PVC is the low-cost option, and it suits light-use corners where budget matters most.
Match the material to the room, not to the catalogue photo. A wet room needs steel, while a busy corridor needs a metal that resists dents. Check the finish against the taps and fixtures in the same room, so the corner does not clash. Our trim size and compatibility chart lists the common profile sizes against tile thickness, which helps when the order covers several tile types.
Installation Points That Decide the Result
Size the trim before you order it. The trim depth should sit one step above the tile thickness, so the tile face ends flush with the trim face. Confirm the depth with our guide to choosing the right trim size. Check that the corner is plumb first: a corner that leans will show a gap, and no trim can hide it. Dry-fit the trim and the corner piece before any adhesive goes down.
Set the trim first, then bring the tile up to it. Press the anchoring leg fully into the thinset, and check the line with a level from top to bottom. Protect the visible face while the room is still a work site, because mortar and grout can mark brushed and coated finishes.
Cover the trim until the room is clean. Plan each trim end at the top and the base, and read how trim ends are finished before you order the end pieces. A planned end looks deliberate, and an unplanned one looks like a mistake.
Outside Corner Trim Buying Checklist
Run this list before you send the order. It catches the errors that cause rework on site, and it gives your supplier one clear set of facts to quote against. Tick each item off with the drawings in front of you.
- Corner count and height from the drawings, so the trim length and piece count match the job.
- Tile thickness for each room, with the trim depth one step above it.
- Profile shape and finish, matched to the taps and fixtures in the same room.
- Material by room: aluminum for dry rooms, stainless steel for wet rooms and outdoors, brass for premium finishes, and PVC where budget leads.
- Corner pieces ordered with the trim, from the same range, in the right count.
- End pieces for the top and base of each run.
- Order a sample first and check the finish and the fit against your tile. Samples take 7 days, so plan them into the schedule.
- MOQ and lead time confirmed in writing: aluminum 1,000 pieces, stainless steel 500, brass 200, and PVC 2,000. Bulk orders take 20 to 30 working days.
- Ask for a technical check on any corner that is not a standard 90 degrees. Our first response comes within 1 working day.
- Inside corners are a different job: they need inside corner cove profiles or sealant, not this trim.
The right finish is the one that fits the room, the tile, and the traffic. A metal trim is the safe default for most corners, while mitring and bullnose earn their place on showpiece walls. Order a sample, check the size, and confirm the piece count before the bulk order goes in.
Frequently Asked Questions
What is the best way to finish a tile outside corner?
For most rooms, an L-shaped metal trim is the best choice, because it protects the edge, fits almost any tile, and installs fast. Mitred edges look cleaner but chip more easily, so they suit low-traffic feature walls. Rounded trims suit family bathrooms where a soft edge is safer.
Do I need to mitre the trim at an outside corner?
No, not if the trim range offers a factory corner piece that caps the joint for you. If no piece exists for your profile, cut both trim ends at 45 degrees so they meet cleanly at the corner.
What size trim do I need for an outside corner?
Choose a trim one step deeper than your tile, so the tile face ends flush with the trim face. Measure the tile thickness first, then check the size chart for the matching profile before you order. A trim that is too shallow leaves the tile proud, and one that is too deep leaves a lip.
Which material is best for outside corner trim in a shower?
Stainless steel is the usual choice for showers and other wet rooms, where moisture never lets up. It holds up better than aluminum in constant moisture. Aluminum suits dry rooms and standard baths, while brass fits premium baths where the finish is part of the design.
Can I use the same trim for inside and outside corners?
No, the two corners need different profiles, because outside corner trim protects a convex edge that sticks out into the room. Inside corners are concave joints that move slightly, so they need a cove profile or a flexible sealant instead. Using the wrong profile can crack grout and expose sharp edges.


